
Table of Contents
If it’s your first time to use a Battery Charger, don’t worry, we’ve got you covered. Here’s a step-by-step guide on how to setup and operate your Panther Battery Charger.
Step 1: Check the condition of your battery and battery charger
- Check if the battery charger you’ll be using is compatible with the battery you plan to charge. If you’re unsure how, check out our article on understanding battery charger specifications

- Make sure that the battery you will be charging is not defective, damaged, leaked or dead. Note that charging these types of damaged batteries could permanently damage your battery charger
- Clean your battery charger by wiping off any dust that might have accumulated. Check to make sure the battery charger clips are also clean before connecting them.

Step 2: Connect the battery clips to the battery to be charged
- First, connect the red battery clip to the positive (+) terminal. Then, connect the black battery clip to the negative (-) terminal of the battery. Never interchange the two battery clips
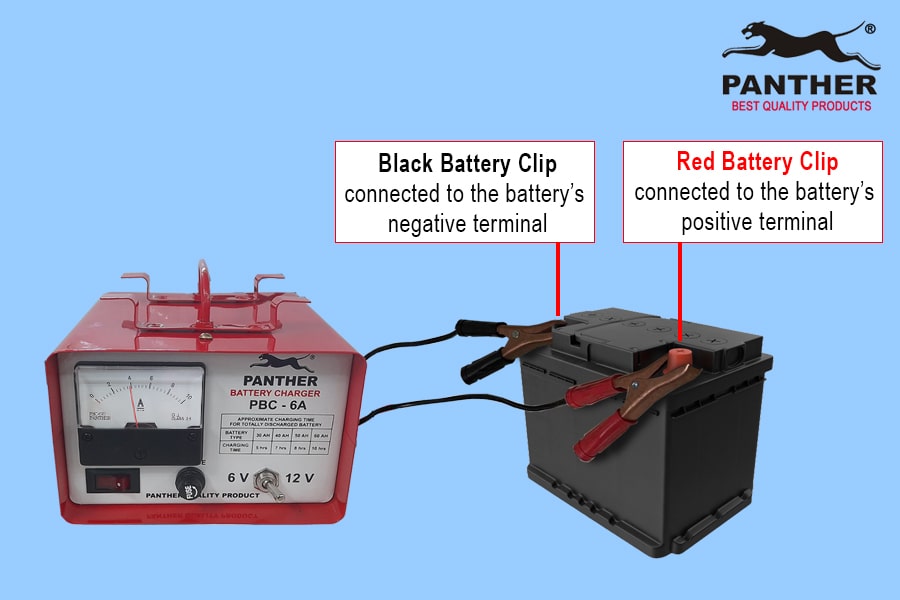
- Likewise, make sure to follow the order mentioned, as connecting the negative (-) terminal first could result in a short circuit. Likewise, make sure the two battery clips don’t touch as this may result in a busted fuse
Step 3: Turn on the Panther Battery Charger
- Plug the input cord of the battery charger to the wall outlet and switch on the power switch
- If the battery charger won’t turn on, check the front fuse and the back fuse of the unit. If the fuse is busted, replace the fuse with the same size and same rating.
- To determine if the fuse is busted, first remove the fuse from its holder. If there is a visible gap in the wire or there are burnt indications inside the fuse then the fuse is busted and needs to be replaced.
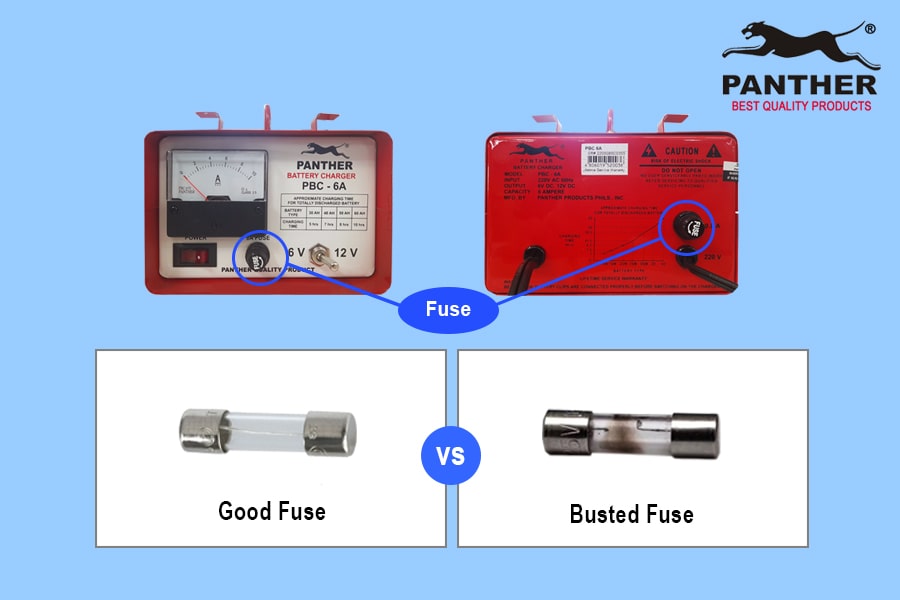
Notes on how to remove the fuse safely (depending on type of fuse)
- Round Fuse: Unscrew the round fuse holder by turning counter-clockwise, then remove the fuse.
- Plug-In Fuse: Remove the fuse plug-in by tugging the fuse by hand
Step 4: Battery charger starts charging the connected battery
- After switching on the battery charger, you will notice that the ammeter pointer will move from left (0, or close to 0) to right. The ammeter reading shows the current (in amperage) needed to fully charge your battery. As the battery charger charges the battery, the ammeter reading pointer will gradually move from right to left. This indicates that the battery is charging properly.
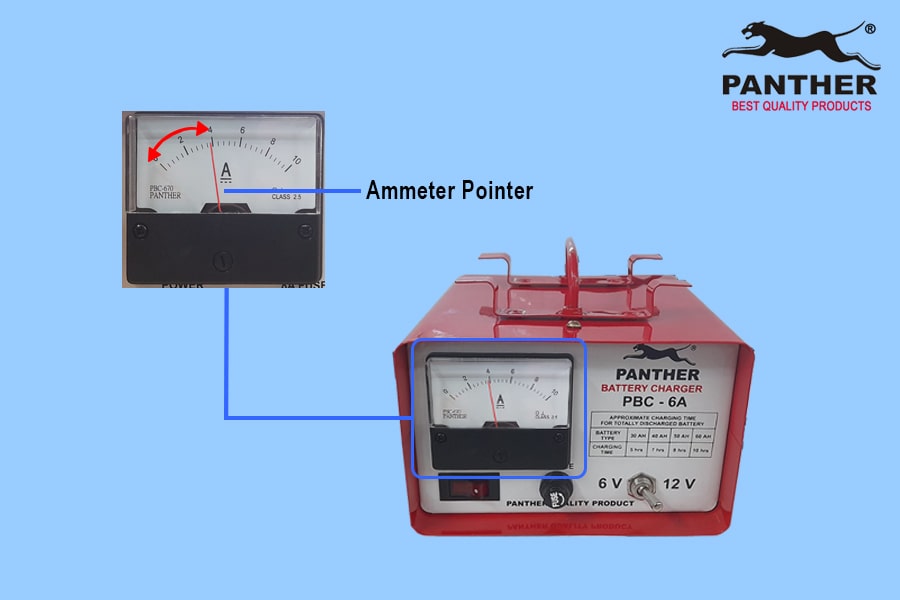
- If the pointer dropped to 0 immediately, has not moved at all from the very start, or has stopped moving after only a brief period of charging; then the battery is defective and needs to be replaced.
Step 5: Determine the approximate charging time for your battery
- Depending on the battery capacity and the Panther Battery Charger’s output current. For your guidance, you may check out the table below for the approximate charging time of different types of batteries for totally discharged batteries.
- When you notice that the ammeter points back to 0, or when the approximate charging time has been reached and the pointer has stopped moving for quite some time, then the battery is said to be fully charged.

- Once charging is done, switch off the battery charger first before disconnecting the black battery clip, then the red battery clip from the battery. If you plan to charge another battery, do make sure to power off the battery charger first before making any battery connection in order to avoid electric shock.
For more concerns and queries, you may reach us through the following channels and we will be glad to be of assistance.
- Email: wecare.panther@gmail.com
- Landline: (02) 8897-0426 | (02) 8697-4608
- Fax: (044) 769 1605
- Customer Service Hotline (Call/Text/Viber): (0998) 954-3316
- Sales Hotline (Call/Text/Viber): (0908) 811-5438



Can Panther battery charger PBC 24A be used to charge Deep Cycle Battery 100Ah LiFePO4 (Lithium Ion Phosphate)? Please advise. Thanks
Good day! No, PBC 24A cannot be used to charge Lithium Ion Phosphate batteries 🙂 We hope this answers your question!
How about 9D type battery 12V. How many hours do I need to Charge it?
Good day Angelo. The charging time for a 9D type battery depends on several factors:
Battery Capacity (Ah): The higher the amp-hour (Ah) rating of the battery, the longer it will take to charge.
Charger Output (Amps): The charging time will vary depending on the output current of the charger.
We hope it helps.