
Table of Contents
- Step 1: Plug the UPS into a verified grounded 3-wire wall outlet.
- Step 2: Fully charge the UPS battery for 10-12 hours before use
- Step 3: Connect your equipment (e.g. computer, monitors, router, etc.) to the BACKUP outlets.
- Step 4 (Optional): Test if the UPS backup function is working
- Step 5 (Optional for PUP 3001): Customize the UPS settings for no load shutdown, DC start and buzzer alarm
The Panther Digital Uninterruptible Power Supply (PUP 501, PUP 701, PUP 1501, PUP 3001) is perfect for your needs because:
- The UPS will provide backup power to your computer for ~6-20 minutes, which gives you sufficient time to save your work and shut down properly during a power outage
- The UPS “Cold Start Function” allows you to start up your computer using the Panther UPS even during a power outage
- The built-in AVR protects your valuable plugged-in appliances from voltage fluctuations 24/7
- The digital LED meter provides up-to-date visualization of the UPS’ condition, resulting in easier troubleshooting
- Most importantly, it’s really easy to set-up, just plug and use!
Let us walk you through how to set up and operate your Panther Digital Uninterruptible Power Supply
Step 1: Plug the UPS into a verified grounded 3-wire wall outlet.
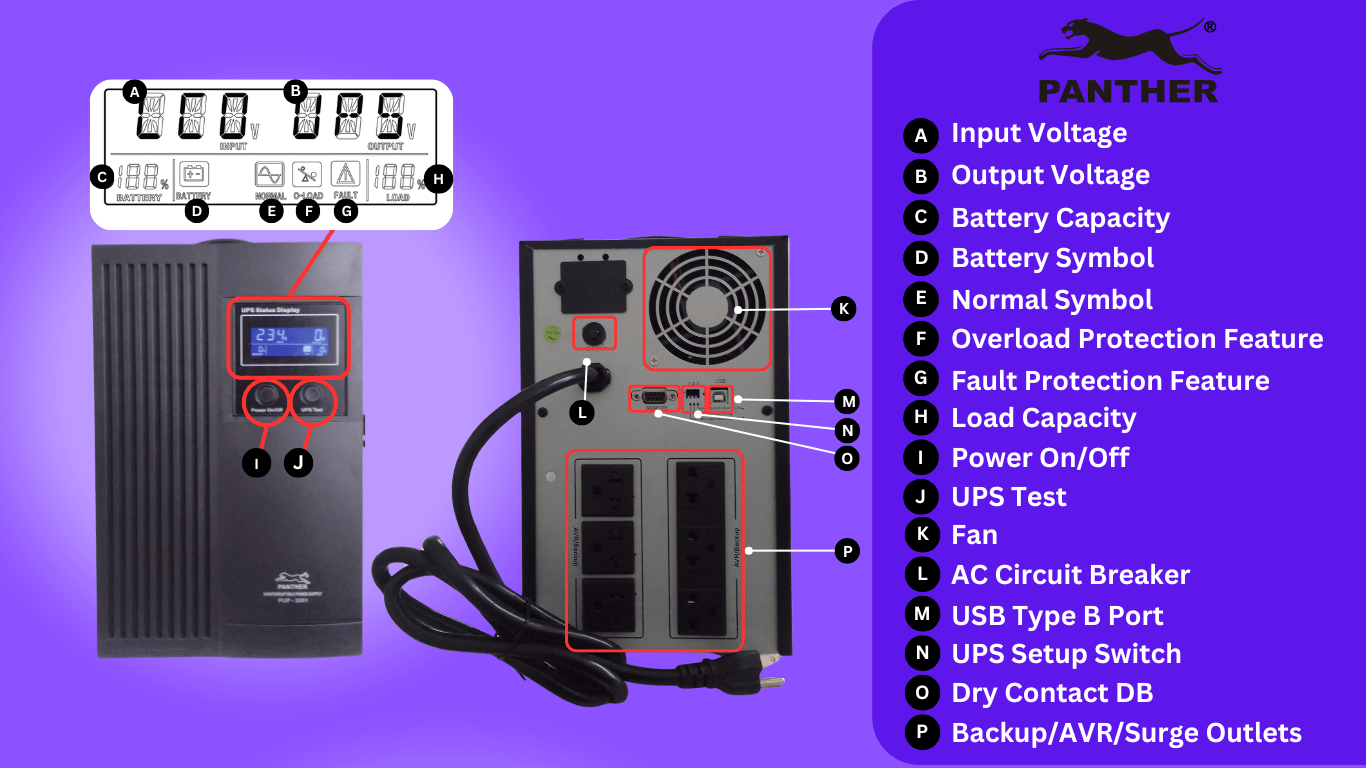
Do NOT tamper with the UPS’ grounded pin. If your house does not support 3-prong plugs, please make use of an adapter plug instead. To know if the UPS has turned on, you will see the digital LED meter light up.
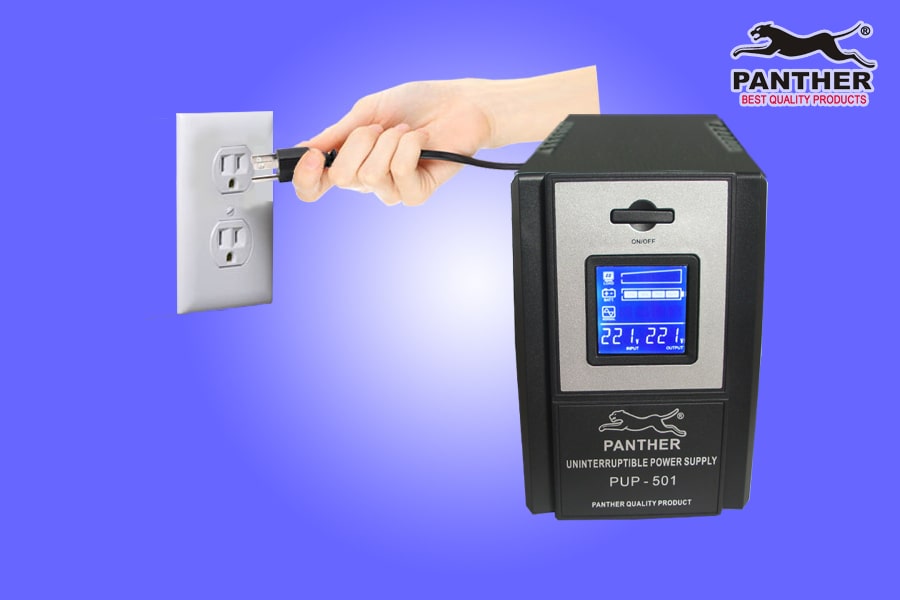
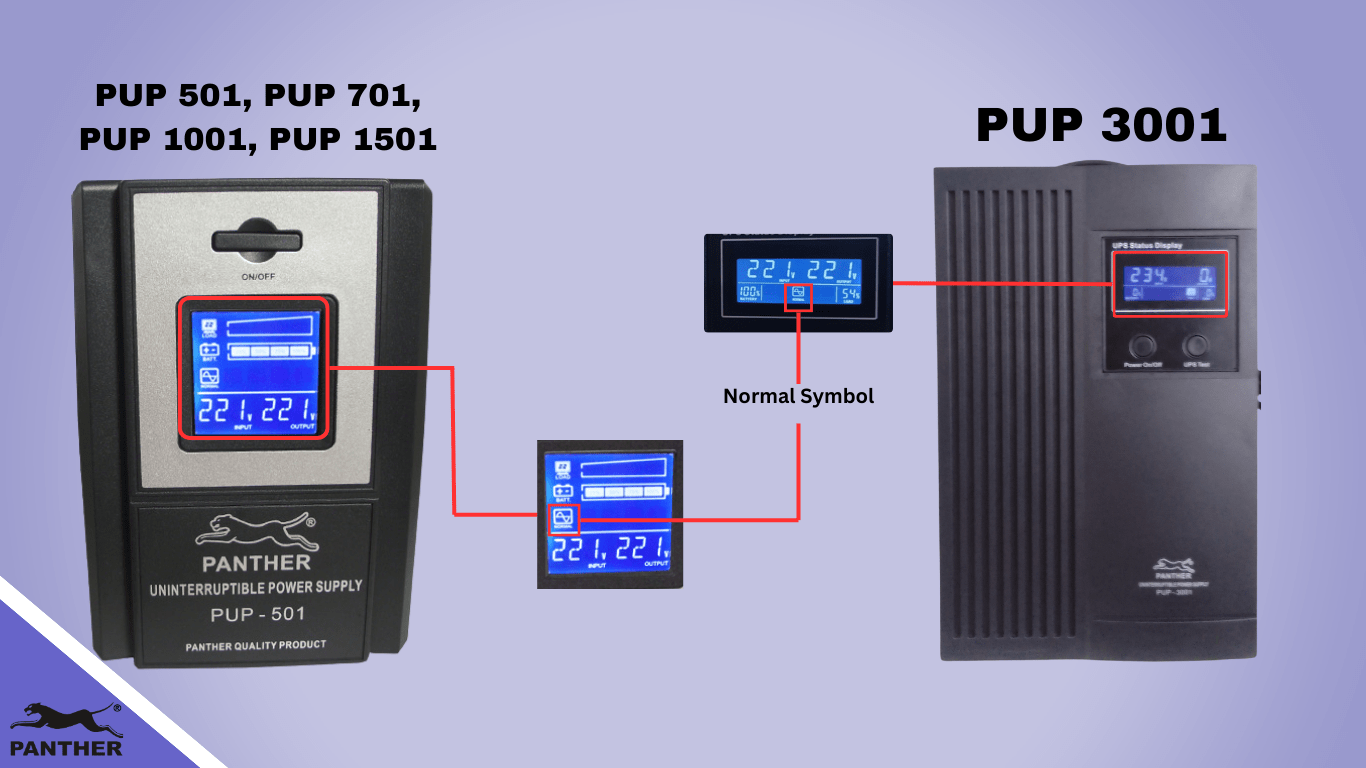
Next, to check and make sure the UPS is properly plugged into AC outlet and is drawing power from the outlet, check if the ‘normal’ symbol can be seen on the LED meter
Step 2: Fully charge the UPS battery for 10-12 hours before use
The UPS will charge its battery automatically whenever it is plugged into a wall outlet.
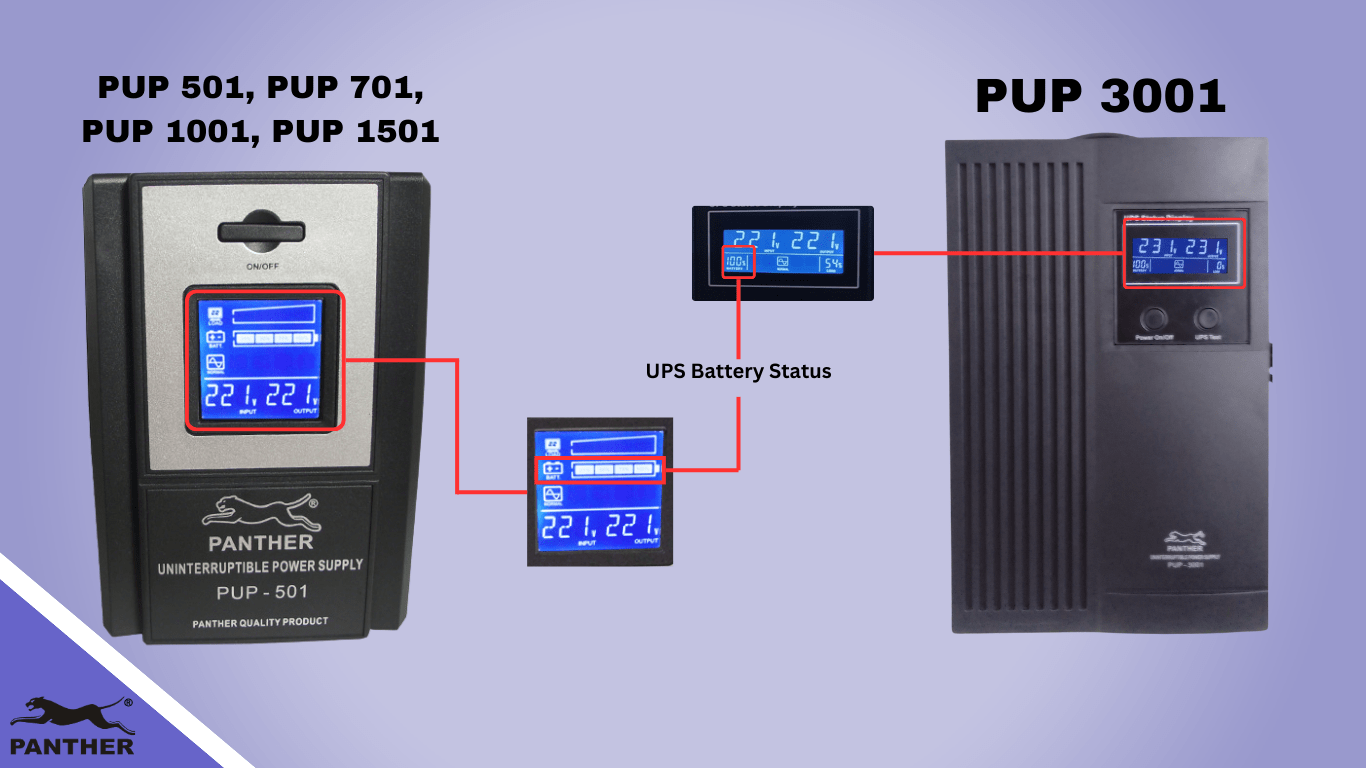
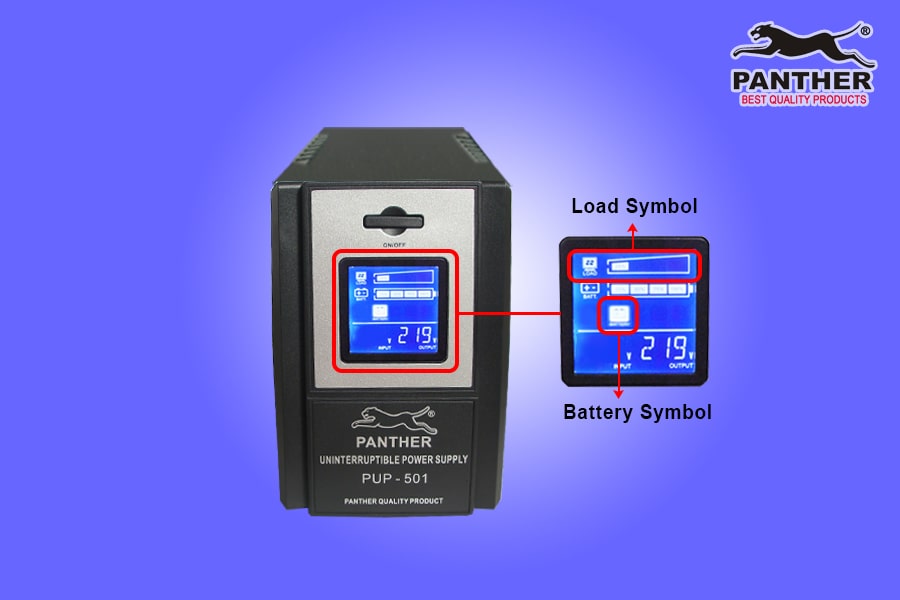
You’ll know the battery is charging if the battery symbol can be seen on the LED meter. If it isn’t, kindly check and make sure that the UPS is plugged in tightly to the wall outlet, and that the wall outlet is supplying power.
Step 3: Connect your equipment (e.g. computer, monitors, router, etc.) to the BACKUP outlets.
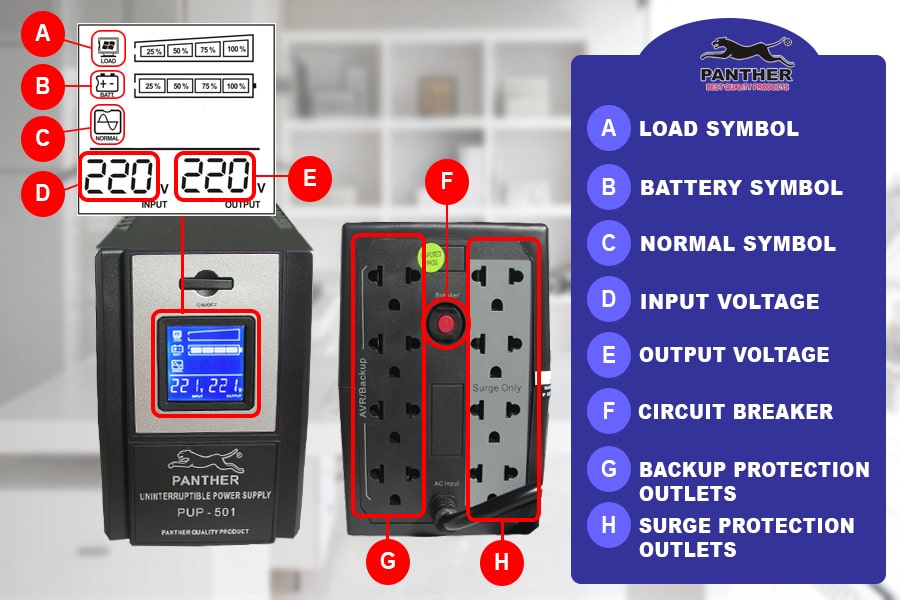
Plug your equipment into the BACKUP outlets because only these outlets are UPS and AVR-protected (for PUP 501, PUP 701, PUP 1501). Note that ALL PUP 3001 outlets are UPS and AVR-protected.
You will know that your device is properly connected when the ‘load’ symbol on the LED meter has bars to indicate percentage of load capacity used up. Make sure that the load capacity does not exceed the UPS’ capacity (> 100%)
To calculate the appropriate UPS capacity for your equipment, you can check out our article on calculating for appliance capacity requirements.
Reminders:
- The Surge Protection outlets of the UPS (for PUP 501, PUP 701, PUP 1501) act purely as an extension cord with voltage surge protection only.
- Printers and plotters should NOT be connected to the UPS. A laser printer or plotter periodically draws a significant amount of power even when idle, and this may overload the UPS. As such, we recommend that these devices be plugged into a wall outlet directly instead
Step 4 (Optional): Test if the UPS backup function is working
To test the backup function of the UPS on its own, unplug all connected equipment from the UPS, then unplug the UPS from the wall outlet. When you do this, the UPS should remain on for ~1-2 minutes before automatically turning off on its own to save battery power (as no device is connected to it).
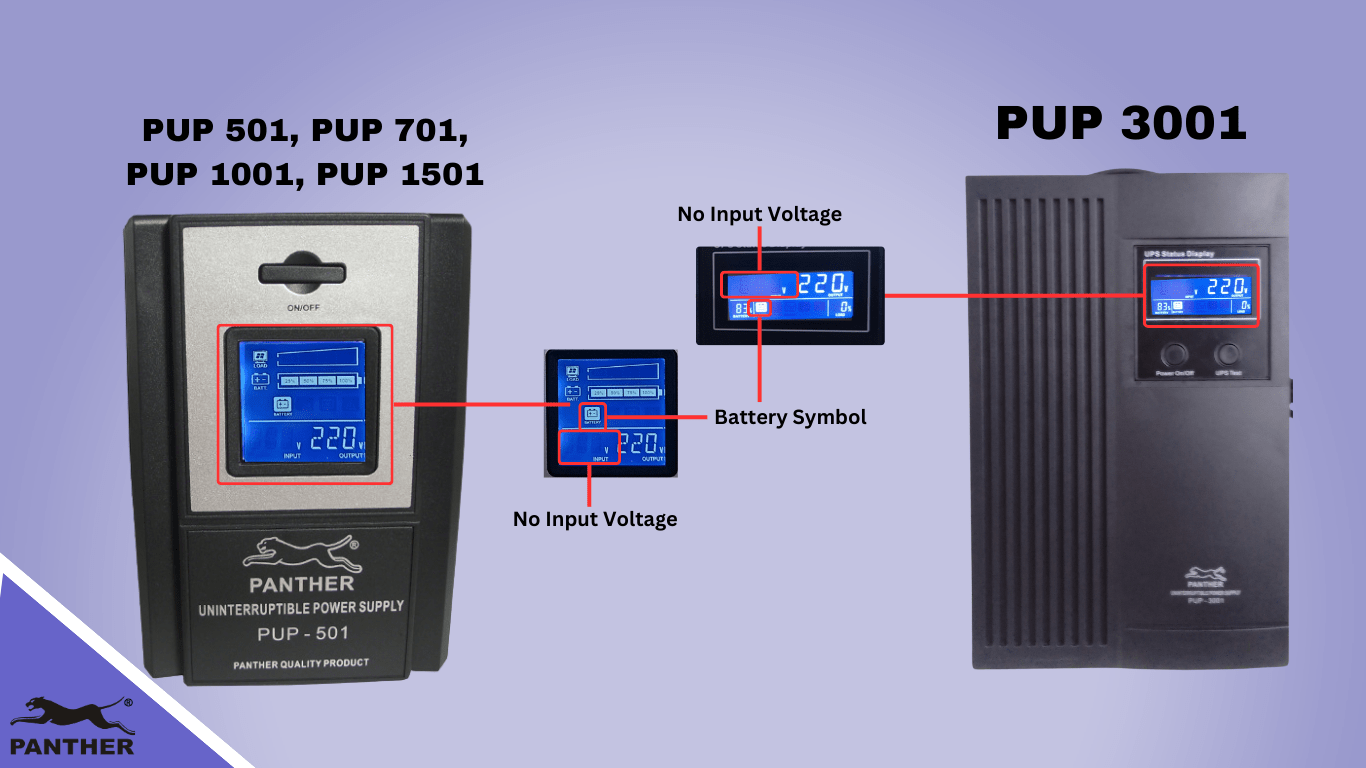
You will see that the LED meter will have no ‘input voltage’ indicated since it draws power from the battery. You will also notice that the ‘battery’ symbol (instead of the ‘normal’ symbol) will be shown in the digital LED meter.
To test the backup function of the UPS when an equipment is plugged in, plug in the equipment then unplug the UPS from the wall outlet. When you do this, three things should happen:
- The equipment plugged into your UPS should remain on. If they turn off, check and make sure they are plugged into the backup outlet.
- The ‘battery’ symbol will flash on the screen and the ‘load’ symbol with percentage bars will remain on the screen. This indicates that the UPS is drawing power from the UPS battery in order to support the connected load.
Alternatively, for PUP 3001, you can also make use of the UPS Test button (found on the UPS front panel). By pressing this button, the UPS will automatically switch to battery mode (simulating battery mode) even if it’s connected to an AC outlet.
- A beeping alarm will be heard twice every 8 seconds. This serves as a warning sound to let you know the UPS battery power is being consumed. When you hear this sound, you should start saving your files, then proceed to shut down the plugged-in equipment.
Reminder: The average run-time (amount of time the UPS battery can power the plugged-in equipment) of the Panther Digital UPS is ~6-20 minutes. The total run-time will depend on the UPS battery condition and the total power load of the equipment plugged into the UPS.
Step 5 (Optional for PUP 3001): Customize the UPS settings for no load shutdown, DC start and buzzer alarm
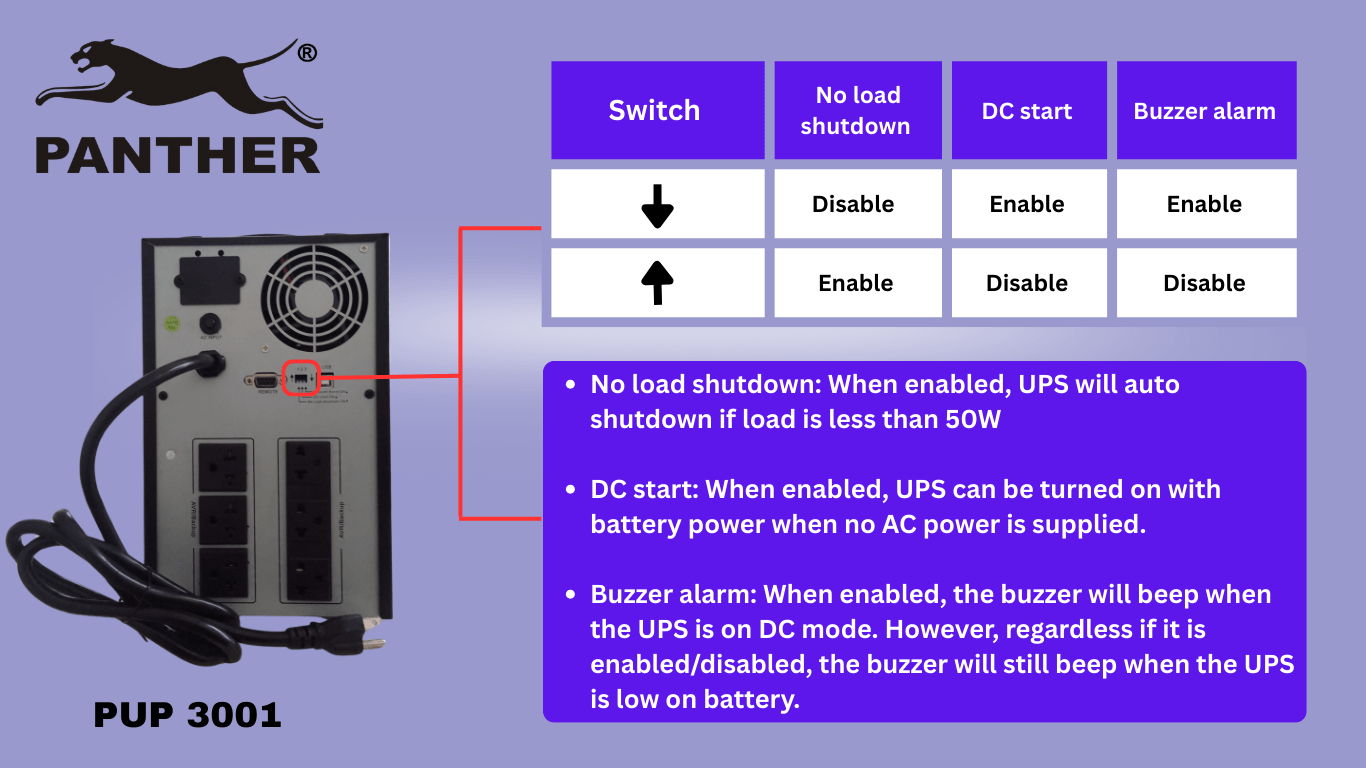
Through the UPS Setup Switch, the PUP 3001 allows for adjustment in settings for:
- No load shutdown: When this function is enabled, the UPS will auto shutdown if the load is less than 50W. When this function is disabled, the UPS will not auto shutdown if the load is less than 50W.
- DC start: When this function is enabled, UPS can be turned on with battery power when no AC power is supplied. When this function is disabled, the UPS cannot be turned on with battery power when no AC power is supplied
- Buzzer alarm: When this function is enabled, the buzzer will beep when the UPS is on DC mode. When this function is disabled, the buzzer will not beep when the UPS is on DC mode. However, the buzzer will still beep when the UPS is low on battery.
Some additional reminders to help prolong the life of your UPS:
- Do NOT overload the UPS. Make sure you purchase a UPS with the appropriate capacity based on the equipment you plan to plug in
- Do not place the UPS near any sources of liquid (e.g. water) or in an environment of excessive humidity
- Do not place the UPS under direct sunlight or close to any heat-emitting sources
- Make sure to fully charge the UPS battery every month for battery maintenance, even when the UPS is not in use.
Similar to motorcycle and car batteries, even if the UPS is not in use (i.e. turned off, not plugged to the wall outlet), the battery will continue to discharge. As such, a battery left unattended will drain on its own and will result in a shortened lifespan.
Once the UPS battery is no longer performing at its best (e.g. unable to hold full charge), we highly encourage you to replace the battery to allow the UPS to continue performing according to its intended function. When in doubt, make use of the Panther Lifetime Service Warranty to get your Panther UPS checked free of charge. Note: Replacement of consumables (e.g. PUP battery) will be charged at cost.

Interesting post. I Have Been wondering about this issue. so thanks for posting. Pretty cool post.
We’re glad you found our post helpful! If you have any questions, please don’t hesitate to message us!
Hey there! I simple would like to give you a big thumbs up.
Thanks! We appreciate it!
Hi,
Just wanna ask, this ups is not recommend to plug in to power generator?
Good day! We do not recommend plugging a UPS into a power generator, as a typically produces inconsistencies and fluctuations in voltage and frequency ranges. We hope this helps!