Table of contents
Table of Contents
- How to Set Up the Grounding Connection to the Inverter Charger
- How to use the Panther Inverter Charger to power up your AC appliance
- Step 1: Look at your equipment’s rated capacity.
- Step 2: Make sure you use 12V DC lead acid battery as the DC power source.
- Step 3: To power the inverter charger, connect the supply ports of the power inverter to the battery.
- Step 4: Plug your equipment (turned off) into the outlets of inverter charger.
- Step 5: Switch on the power inverter.
- Step 6: Turn on your appliance and it’s now ready to use!
- Step 7: Turn off the Inverter Charger when not in use
- How to use the Panther Inverter Charger to charge a battery
- How to take care of and maintain the Panther Inverter Charger?
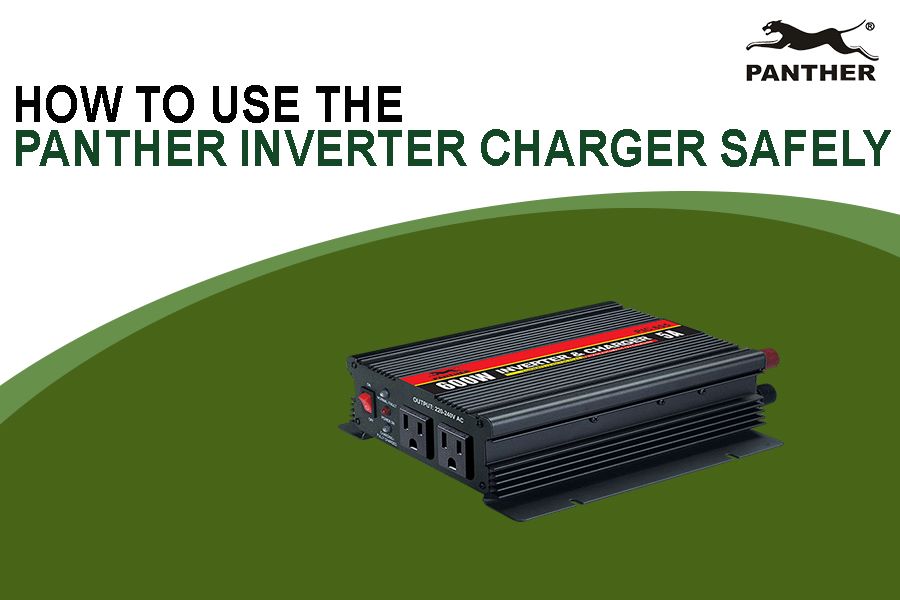
Here in the Philippines, power outages are common, and certain areas of the country still don’t have regular access to power. However, in today’s world, everything uses electricity – from household appliances like refrigerators and fans, to laptops used for work. So what can we do?
Thankfully, Panther’s Inverter Charger is here to save the day!
How does it work? The Panther Inverter Charger supplies AC power to your appliances (via a battery source) when you need it. Then, once you have access to AC power, the same Inverter Charger can then recharge your batteries so you can use them as a power source again! It’s a never-ending cycle. Through this inverter charger, you will never have to be separated from modern conveniences like TV, gadgets and gaming systems ever again.
Interested to own one and set it up? Read on to figure out how to set up the Panther Inverter Charger, and ensure your days of suffering when there’s no power is over.
How to Set Up the Grounding Connection to the Inverter Charger
Before we start discussing how to set up and use the Panther Inverter Charger, it’s important to set up the grounding connection first to ensure your safety.
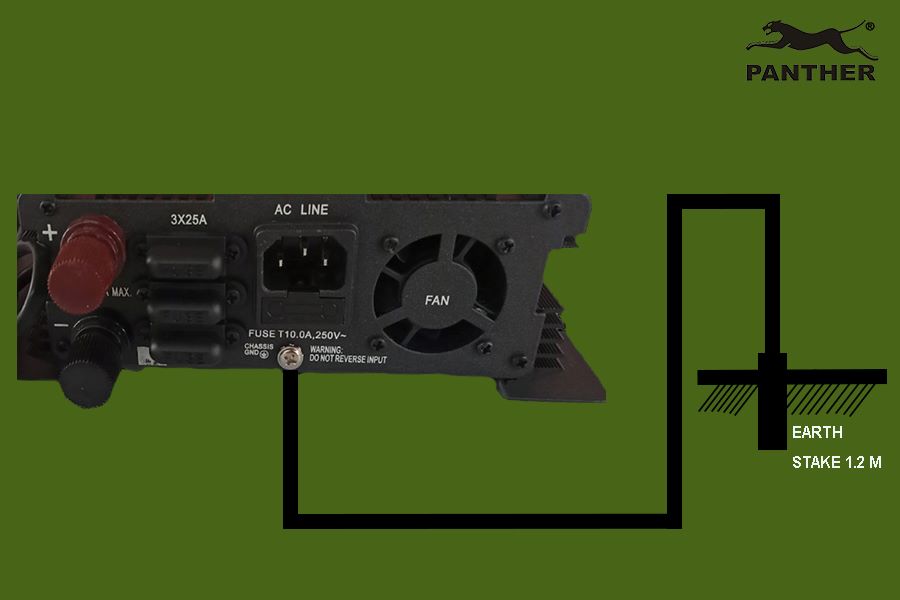
Where can I find the earth terminal?
- On the rear panel of the Inverter Charger is a terminal fitted with a nut. This terminal is connected to the case of the Inverter Charger and also to the earth terminal of the AC output socket (neutral terminal – same as a standard household power point where the neutral line is bonded to the earth, and there is normally no voltage between them).
- Make sure to use the heavy-duty, green-insulated wire when connecting the earth terminal to the ground
How can I set up the grounding connection on a stationary land based installation?
- The earth terminal should be connected to a metal earthing stake driven into the ground to a depth of 1.2m or more.
- If the battery system powering the Inverter Charger does not have a connection to the ground, one of the battery terminals (commonly the negative terminal) should also be connected to the earthing stake.
How can I set up the grounding connection on a vehicle installation?
- When the inverter is wired directly to the battery, the earth terminal is simply connected to the vehicle chassis.
- If the inverter charger is to be used on a temporary basis only, the earth terminal should be connected via a short link to either the negative or positive DC input terminal of the Inverter Charger, depending on whether the vehicle has a negative or positive chassis connection. Note that most vehicles in the Philippines are negative ground vehicles.
- However, when using the Inverter Charger to power the equipment used outside the vehicle, an earthing stake should also be used (as described in the land based installation)
How can I set up the grounding connection on a boat?
- The earth terminal should be connected to the existing grounding system, which may be the hull of the craft, or a network of ground wires.
How to use the Panther Inverter Charger to power up your AC appliance
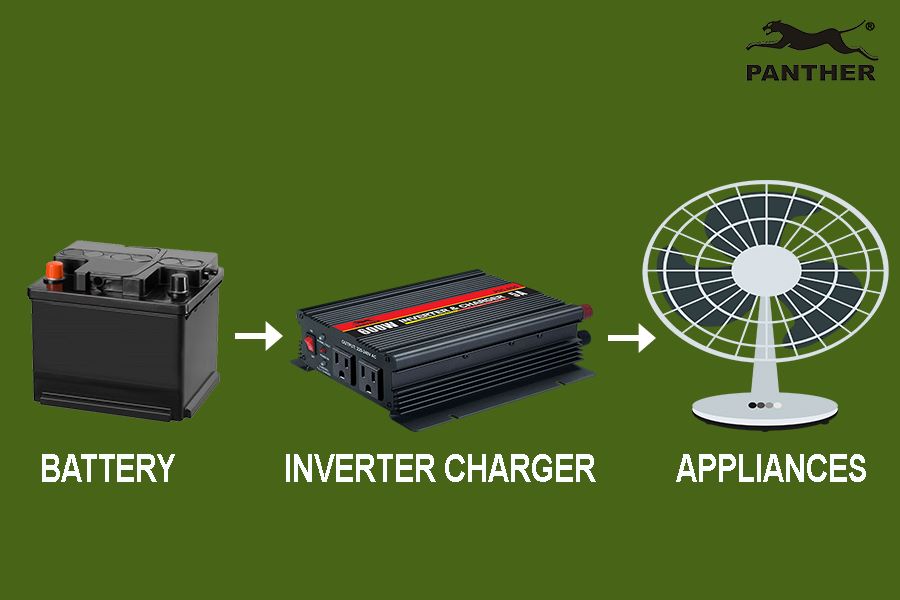
Step 1: Look at your equipment’s rated capacity.
Make sure that the equipment you will plug into does not exceed the 600 VA capacity of the Panther Inverter Charger.
In order to determine your equipment’s maximum power consumption and ensure it is within the inverter charger’s rated capacity, you can check out our handy appliance capacity requirement formula
Connecting equipment with a higher power consumption compared to the Panther Inverter Charger’s rated capacity would result in the Inverter Charger’s protective circuit kicking in. You will hear a buzzer sound as a form of alarm, and the Inverter Charger will then cut off the power output to the appliance.
Step 2: Make sure you use 12V DC lead acid battery as the DC power source.
Note: Using a battery that is NOT 12V DC lead acid as the DC power source would result in damage to both the Inverter Charger and to the battery as well.
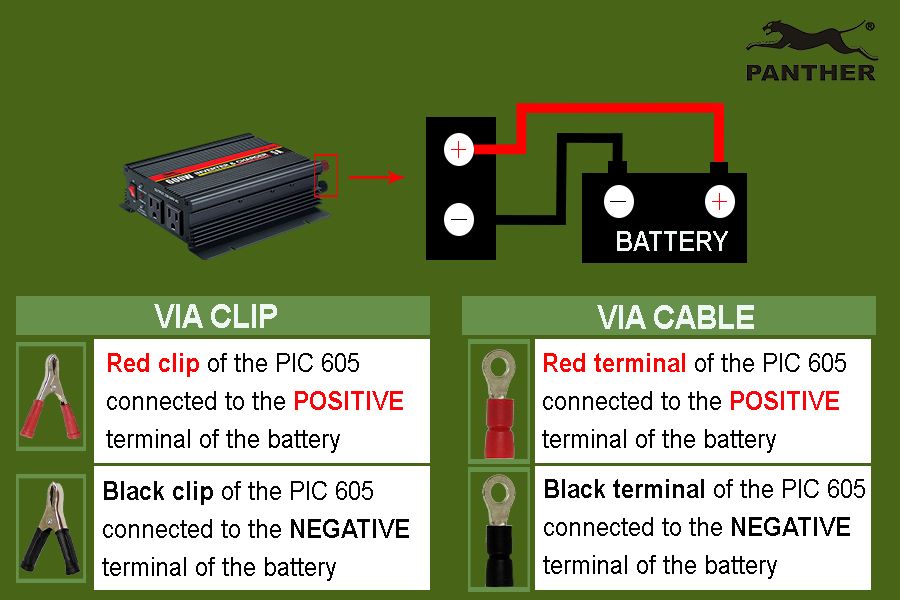
Step 3: To power the inverter charger, connect the supply ports of the power inverter to the battery.
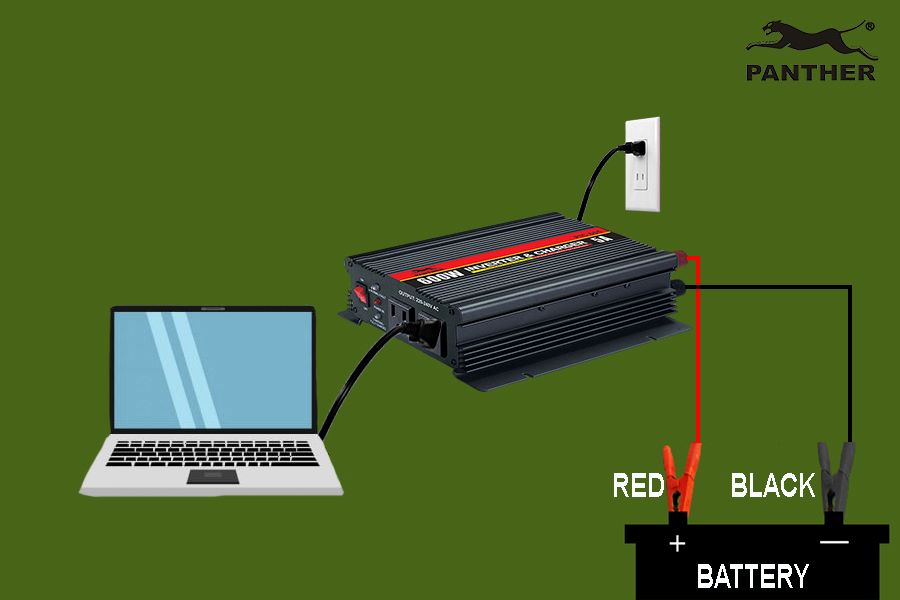
Screw the terminal of the RED and BLACK cable to the inverter (color-coded). Afterwards, connect the other end of RED cable to the POSITIVE terminal of the battery and the other end of BLACK cable to the NEGATIVE terminal of the battery.
A common question asked is: Can we use a car battery (that’s still connected to the car engine) to power up the Panther Inverter Charger?
Yes, you can. The car battery can be used as a battery source for the Inverter Charger both when the engine is turned on and turned off. However, never restart the car engine while the inverter charger is in use, as this will cause damage to the inverter.
Having said that, if you are using the inverter charger with a turned off engine, make sure to do this every 2-3 hours (or when you hear a beeping sound, which indicates low battery voltage) to ensure your car engine battery won’t die out:
- Turn off the inverter charger first
- Start up the engine and let it run for ~0.5 – 1 hour to recharge the car battery
- Afterwards, you can opt to switch off the engine again to save on gas
- Turn on the inverter charger and use again
Reminders when connecting the battery to the inverter charger:
- Make sure the battery is in good condition in order to minimize damage to the inverter charger.
- Make sure the Inverter Charger is turned off, as keeping it on as you connect the battery could result in a short circuit
- Do not connect the battery clips or cable at the same time. Instead, connect the clips one at a time.
- Do not reverse the polarity of the clips or cable. Instead, always make sure to connect the positive (red) to the positive terminal, and the negative clip (black) to the negative terminal.
If any of the four reminders are not followed, the inverter charger’s fuse will become busted.
Step 4: Plug your equipment (turned off) into the outlets of inverter charger.
Plug your consumer electronics or appliances into the AC outlets of the inverter charger. Always turn on the inverter charger first, BEFORE turning on the appliance.
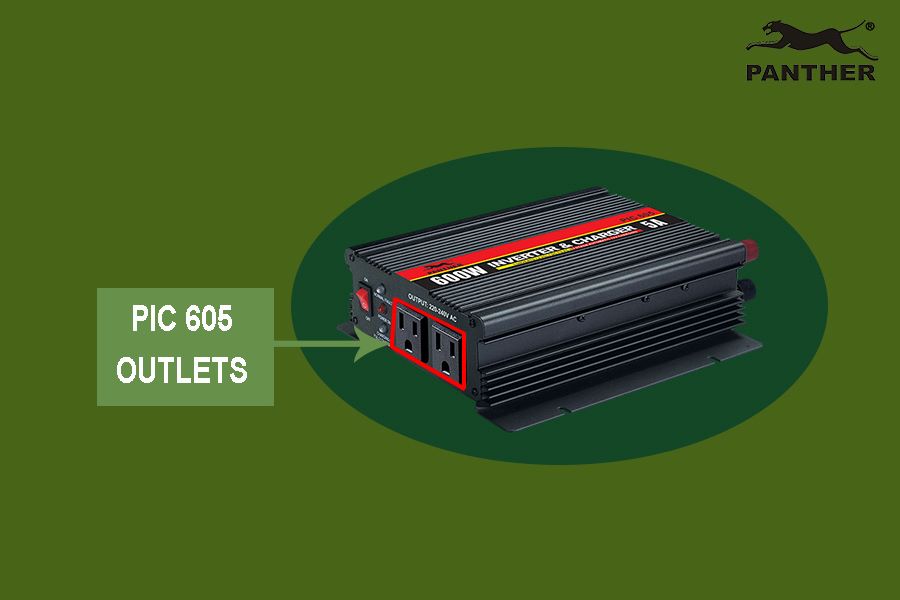
When connecting electrical appliance with cathode ray tube, such as a TV set and computer, the electrical appliance may need to be started several times before it can work smoothly, as the inverter charger produces modified sine wave AC power.
Make sure you have plugged your equipment into the inverter charger properly (no loose connection, with the plug intact against the outlet) to avoid short circuit or electric damage.
Using an extension cord in order to plug in more appliances or to extend the reach is allowed and should not affect the inverter charger’s performance, UNLESS:
- The extension cord length is greater than 100 feet (~30 meters)
- The power consumption of appliances plugged into the extension cord is greater than the inverter charger’s rated capacity
Step 5: Switch on the power inverter.
Once you turn on the inverter charger switch, the switch light indicator should light up, GREEN LED should also be lit up, which means the inverter charger is working properly and all the inverter outlets are now being supplied power.
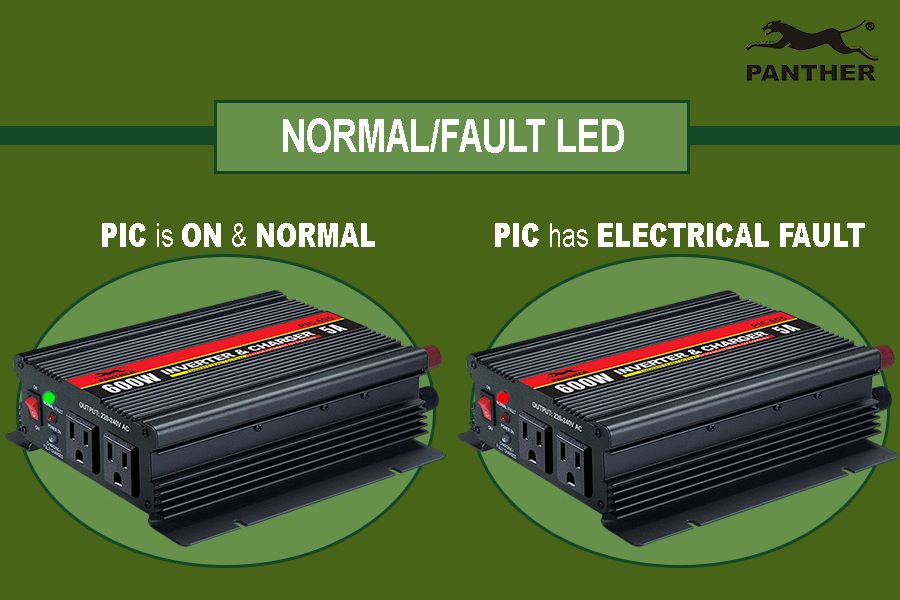
In case the Inverter Charger doesn’t work, this may be because the protection circuit has automatically cut off the output due to:
- Electrical system fault, such as a short circuit. When this happens, the RED LED (Normal/Fault) will also light up.
- Overload, meaning the plugged in appliance’s power consumption is greater than the Inverter Charger’s rated capacity.
When this happens, switch off the Inverter Charger at once, disconnect all appliances, and isolate what the issue is. Once the issue is fixed, only then should you use the Inverter Charger again.
In case the Inverter Charger emits a buzzer sounds, this indicates that the battery voltage is very low and the inverter will be disconnected in 5 minutes. If this happens, turn off your power inverter and replace the battery with a good condition battery in order to use the inverter charger again. You can also recharge your battery first, before reconnecting the inverter again.
Step 6: Turn on your appliance and it’s now ready to use!
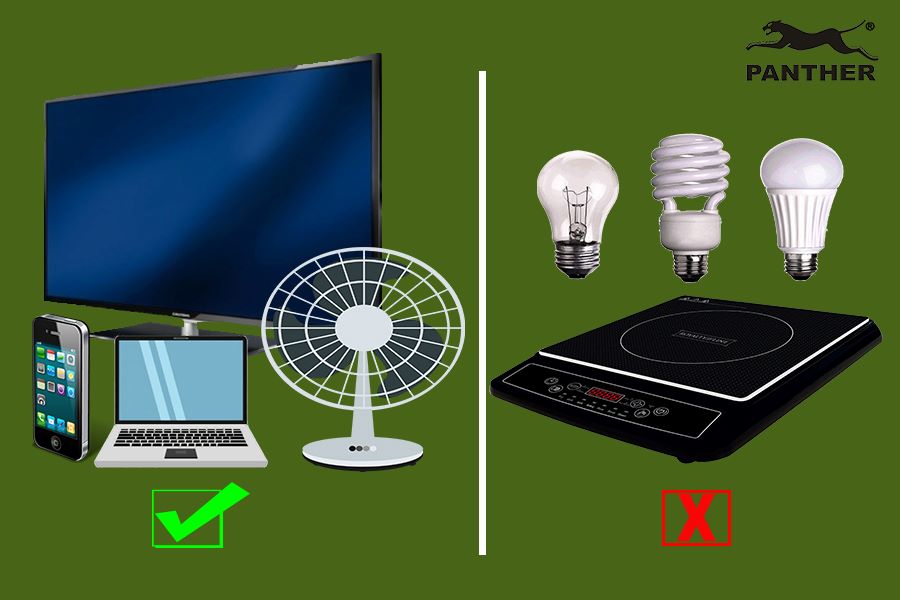
Reminder: This product can be used for charging cellphones, tablet and laptop, TV, stereo/amplifier, fan; but should not be used with T5 – T9 lamp, induction cooker, compressor type equipment and LED products.
Note: The Inverter Charger will switch off automatically if:
- The total wattage of the electrical appliances exceeds the inverter charger’s output capacity. If the plugged in appliance is significantly higher than the inverter charger capacity, this could also result in a busted fuse
- The temperature of the Inverter Charger exceeds 65 °C +/- 10% due to prolonged use. Always make sure to place the Inverter Charger in a well-ventilated area. If it does turn off due to excessively high temperatures, switch off the inverter charger immediately. Disconnect the appliances and wait for the Inverter Charger to cool off. Only then should you switch on the Inverter Charger again.
Step 7: Turn off the Inverter Charger when not in use
How to use the Panther Inverter Charger to charge a battery
Step 1: Make sure all load is disconnected from the AC inverter before switching to Battery Charger mode
Failure to disconnect appliances plugged in to the Inverter Charger prior to starting the battery charging process may result in an input spike which will damage the Inverter Charger
Step 2: Connect the AC Input Power to the wall socket
Make sure there is electricity being supplied to the wall socket. Note: The Panther Inverter Charger does NOT need to be turned on in order for it to start charging the battery
Step 3: Connect the battery to the Inverter Charger
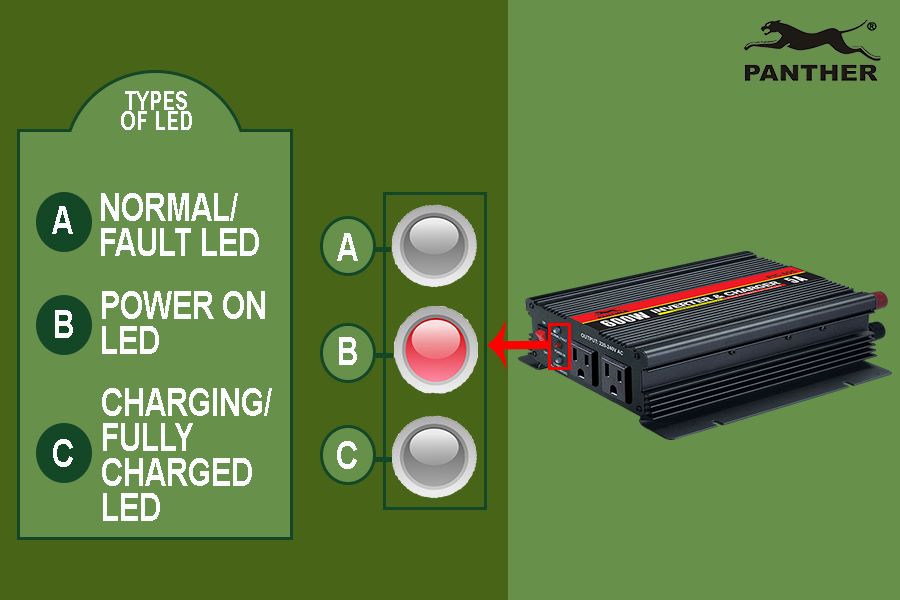
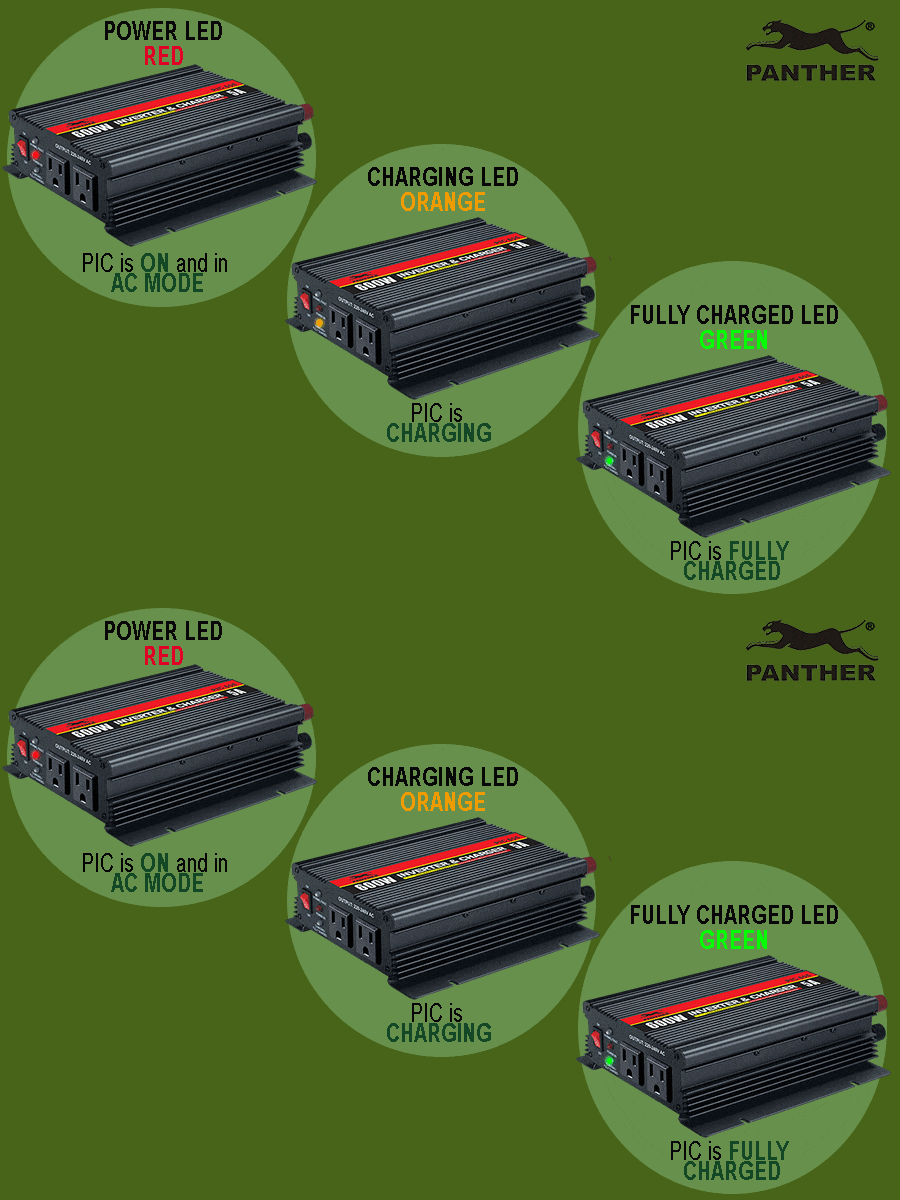
Connect the RED clip of the inverter to the POSITIVE terminal of the 12V DC Lead Acid battery. Afterwards, connect the BLACK clip of the inverter to the NEGATIVE terminal of the battery. The red LED light (Power On) should illuminate, which indicates the inverter is connected to an AC power source and the battery is receiving power.
Remember, keep an eye out on the LED indicators of the Panther Inverter Charger to get a good sense of what’s happening. Here’s a handy guide you can use for reference
- Charging begins
As soon as the Inverter Charger is plugged into the AC power supply (even if not turned on), it will automatically start charging. The Orange LED light (Charging/Fully Charged) will start blinking, which indicates the battery is being charged.
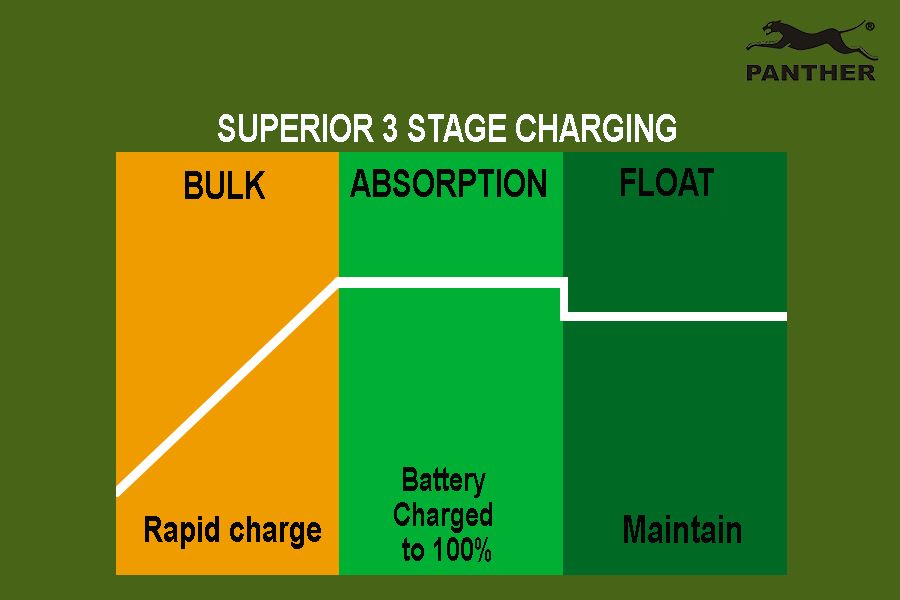
A superior 3 stage charging will now take place, which is ideal for deep cycle batteries.
Stage 1: Bulk (Constant Current)
At this stage, the inverter charger provides the maximum charging current to the battery in order to charge the battery faster.
Stage 2: Absorption (Constant Voltage)
In this stage, the inverter charger will supply a lower charging current to enable the battery to absorb more power and to prevent overcharging.
Stage 3: Float
In the final float stage, the inverter charger will provide a low current charge in order to maintain the battery’s fully charged state indefinitely. This ensures the battery is ready for use when you need it, while preventing overcharging.
Once the battery is fully charged, the orange LED light (Charging/Fully Charged) will now change to the color green, and this light will remain steadily lit.
NOTE: In case of a sudden power outage while you are charging the battery, you can quickly switch to Power Inverter mode as the Inverter Charger will automatically change from getting power from the wall socket, and instead get power from the battery instead. So, at this point, simply plug your consumer electronics or appliances into the AC outlets of the inverter charger. Turn on the inverter charger first, BEFORE turning on the appliance. And voila!
How to take care of and maintain the Panther Inverter Charger?
Very little maintenance is required for the Panther Inverter Charger. Clean the exterior of the unit periodically with a damp cloth to prevent accumulation of dust and dirt. At the same time, tighten the screws on the DC input terminals.
Always keep the inverter in an environment which is:
- Well-ventilated
- Not exposed to direct sunlight or any other heat source
- Inaccessible to children
- Safe from water/moisture, oil or grease
- Safe from any flammable substance
If you encounter unusual activity that seems different from normal operation, don’t hesitate to reach out to us. You may contact us through the following channels:
Email: wecare.panther@gmail.com
Call/Viber: (0998) 954-3316

0 Comments