
Table of Contents
- Step 1: Check your equipment’s rated capacity.
- Step 2: Check what battery input voltage you will use as a DC source.
- Step 3: To power the inverter, connect the supply ports of the power inverter to the battery.
- Step 4: Plug your equipment (turned off) into the outlets of power inverter.
- Step 5: Switch on the power inverter.
- Step 6: Turn on your appliance and it’s now ready to use!
- Interested to purchase a Panther Power Inverter?
Brownouts or power outages are quite common in the Philippines. This can occur due to various reasons such as strong typhoons and natural disasters causing damage to power lines. Brownouts in some areas can also be caused by aging infrastructure, factories undergoing maintenance and the electricity provider’s inability to reach a certain area.
As a result, household and daily tasks are disrupted by the lack of power. Without electricity, you won’t be able to use your appliances, such as air conditioner and computers. What can we do though? Do we have options?
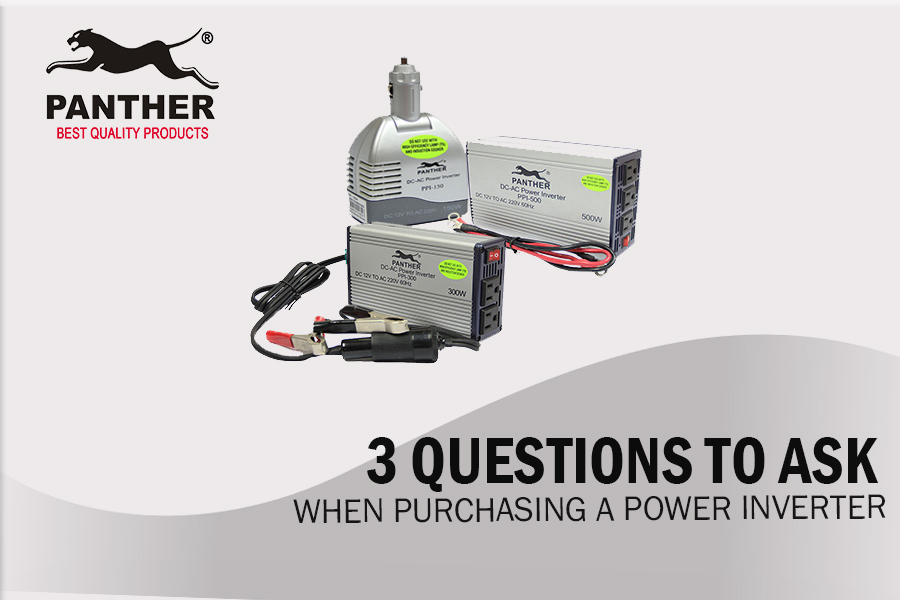
Of course you do! Panther’s Power Inverter ensures you will always have AC power supply for your consumer electronics and appliances.
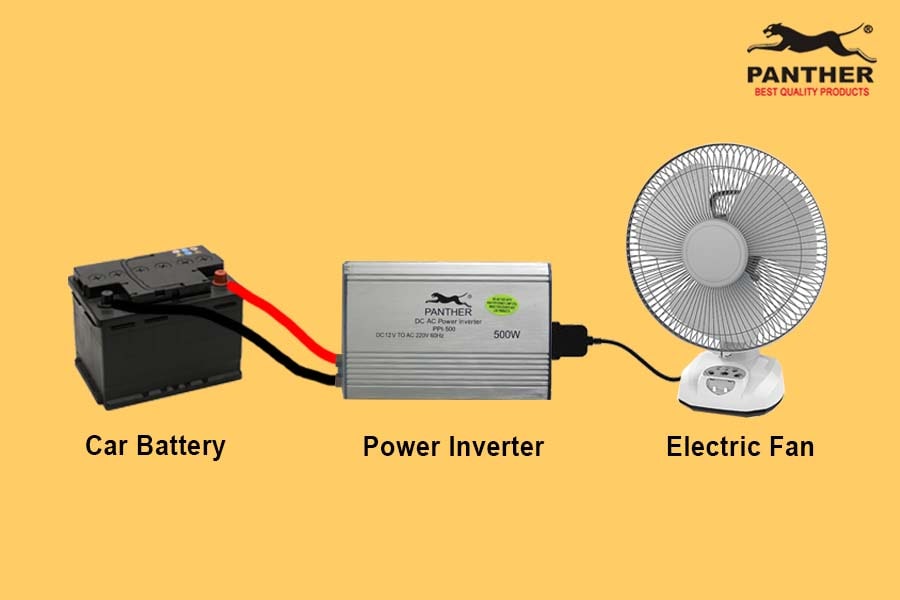
How does it work? Simply use the power inverter to convert a DC power source (such as car batteries) into an AC power source for your appliances such as electric fan, refrigerator, TV, gadgets and gaming systems.
If you’ve already purchased a Panther Power Inverter, your days of suffering from power outages are over. Here, we lay out the steps on how to setup and operate the Panther Power Inverter in order to avoid misuse and prevent damage to the unit.
Step 1: Check your equipment’s rated capacity.
Make sure that the equipment you will plug into the inverter is within the inverter’s rated capacity. To determine your equipment’s maximum power consumption in order to check if it is within the inverter’s rated capacity, you can check out this link: https://panther.ph/how-to-calculate-appliance-capacity-requirements/
Alternatively, you can also check with the equipment’s manufacturer to ensure you purchase the appropriate Power Inverter suited for your needs.
Note: If you’ve plugged in an equipment with a higher rated capacity into the inverter, the inverter’s fuse will become busted, in order to protect your power inverter from overload damage.
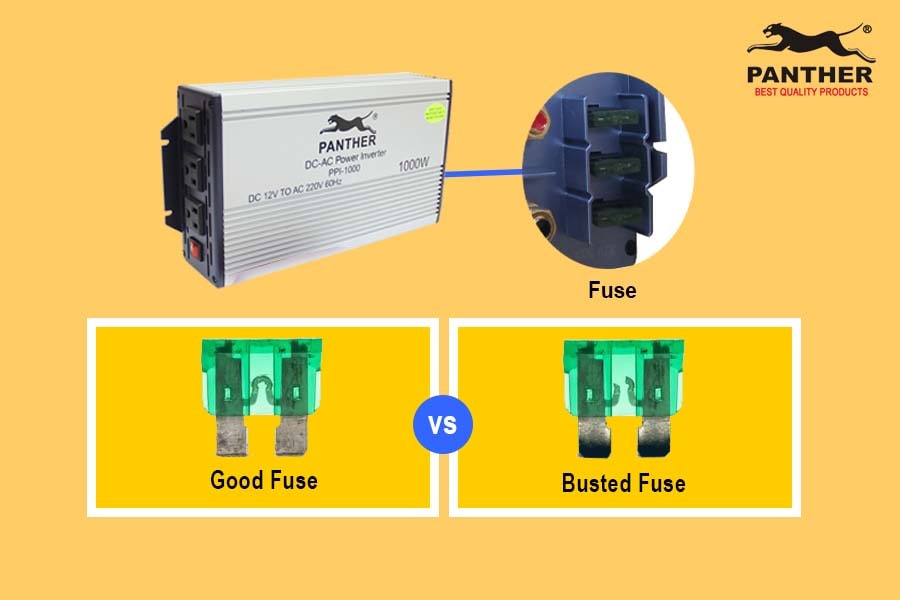
If your fuse is busted, simply turn off the switch of the power inverter, then replace the fuse with a fuse of the same size and rating. If you aren’t sure of the fuse size and rating, please message us directly so we can assist you. Do NOT place a fuse that is of bigger size and rating.
Make sure to NOT plug in the same equipment into the power inverter again as well, as this would simply result in the fuse being busted again.
Once you’ve replaced the fuse, turn on the unit again and see if it will work.
Step 2: Check what battery input voltage you will use as a DC source.
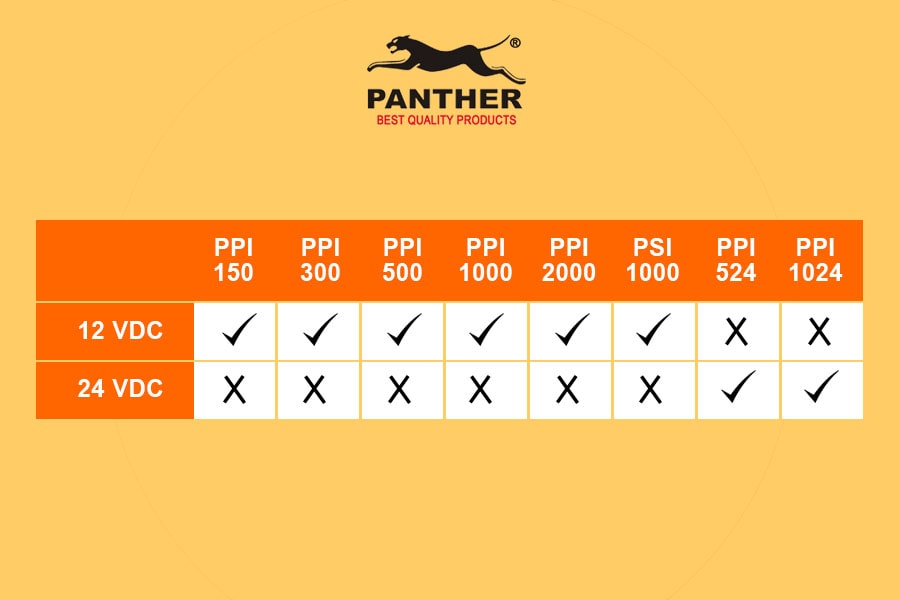
In the table above, it shows the voltage suitable for each Panther Power Inverter model.
If you happen to connect a 24V DC battery to an inverter that requires a 12V DC input voltage, this will result in a busted fuse once you turn on the inverter. Again, simply replace the fuse (as laid out in Step 1), then connect the appropriate battery (12V DC) to the power inverter.
On the other hand, if you connect a 12V DC battery to an inverter that requires a 24V DC, the inverter will produce a continuous beeping sound. This alarm indicator will inform you that you’ve connected the wrong battery to the inverter. When this happens, disconnect the previous battery source, replace with the correct battery source, then check if the inverter will work.
Note that 24V DC occurs when two 12V DC batteries are placed in series and are used together. However, keep in mind that batteries used in series must be charged together as well, in order to ensure that the battery conditions remain the same
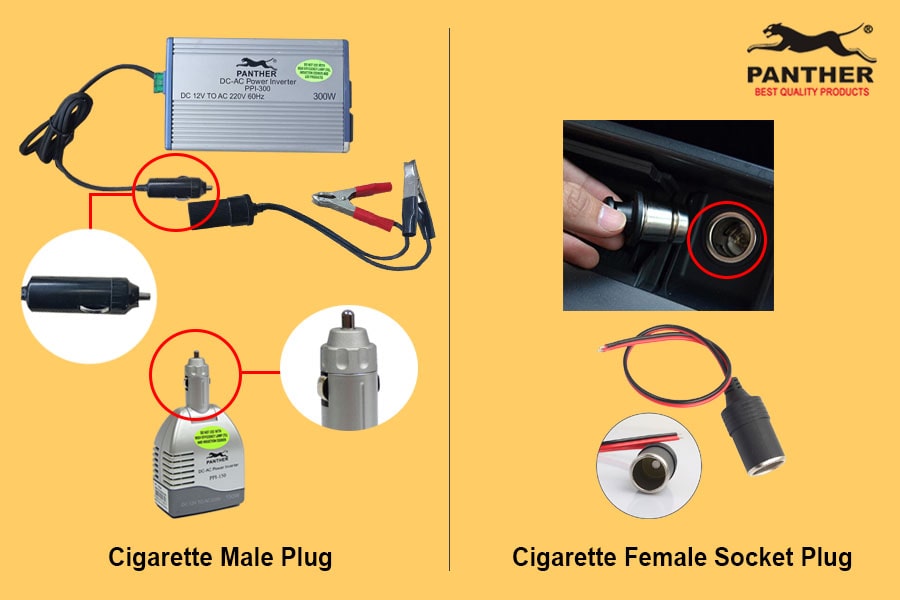
Step 3: To power the inverter, connect the supply ports of the power inverter to the battery.
- For PPI 150 and PPI 300 (when using the cigarette plug): Connect the male plug of the inverter to the female socket plug of your supply.
- The Panther Power Inverter can only be used with negative ground vehicles, which is the case for most Philippine cars. If in doubt, kindly check with the car manufacturer to be sure.
- For PPI 300 (when using battery clip to connect to the external DC Battery): Connect the RED clip of the inverter to the POSITIVE terminal of the battery. Afterwards, connect the BLACK clip of the inverter to the NEGATIVE terminal of the battery.
- For PPI 500, PPI 1000, PPI 2000, PPI 524, and PPI 1024 (when using cable to connect to the external DC Battery): Screw the terminal of the RED and BLACK cable to the inverter (color-coded). Afterwards, connect the other end of RED cable to the POSITIVE terminal of the battery and the other end of BLACK cable to the NEGATIVE terminal of the battery
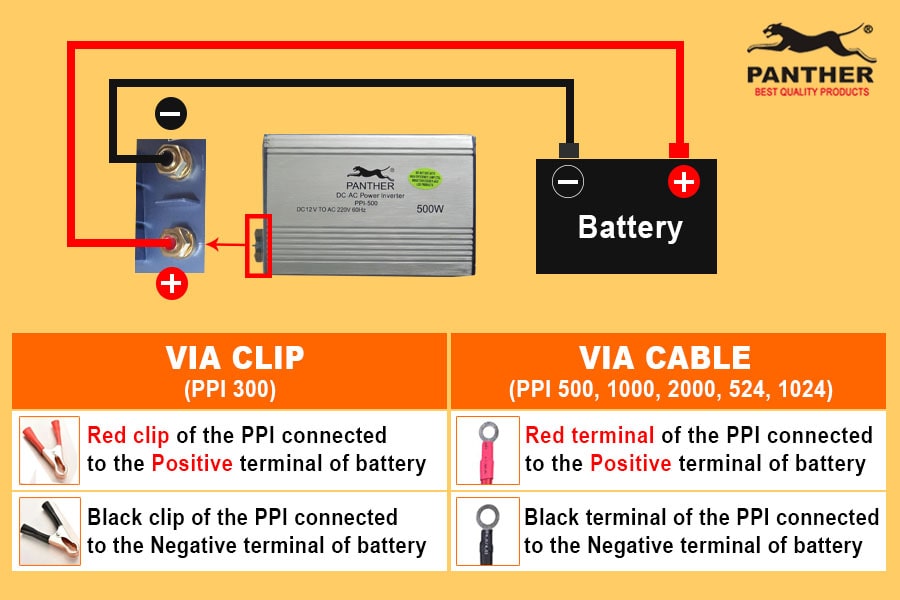
Reminders when connecting the battery to the power inverter:
- Make sure the battery is in good condition in order to minimize damage to the power inverter.
- Do not connect the battery clips or cable at the same time. Instead, connect the clips one at a time.
- Do not reverse the polarity of the clips or cable. Instead, always make sure to connect the positive (red) to the positive terminal, and the negative clip (black) to the negative terminal.
If any of the three reminders are not followed, the power inverter’s fuse will become busted.
FAQ: Can we use a car battery (that’s still connected to the car engine) to power up the Panther Power Inverter?
Yes, you can. The car battery can be used as a battery source for the Power Inverter both when the engine is turned on and turned off. However, never restart the car engine while the power inverter is in use, as this will cause damage to the inverter.
Having said that, if you are using the power inverter with a turned off engine, make sure to do this every 2-3 hours to ensure your car engine battery won’t die out:
- Turn off the power inverter first
- Start up the engine and let it run for ~0.5 – 1 hour to recharge the car battery
- Afterwards, you can opt to switch off the engine again to save on gas
- Turn on the power inverter and use again
Step 4: Plug your equipment (turned off) into the outlets of power inverter.
Plug your consumer electronics or appliances into the AC outlets of the power inverter. Always turn on the power inverter first BEFORE turning on the appliance.
Make sure you have plugged your equipment into the inverter properly (no loose connection, with the plug intact against the outlet) to avoid short circuit or electric damage.

Using an extension cord in order to plug in more appliances or to extend the reach is allowed and should not affect the power inverter’s performance, UNLESS:
- The extension cord length is greater than 60 feet (~18 meters)
- The power consumption of appliances plugged into the extension cord is greater than the inverter’s rated capacity
Step 5: Switch on the power inverter.
Once you turn on the power inverter switch, the switch light indicator should light up, GREEN LED should also be lit up (for PPI 500, 1000, 2000, 524, 1024) and all the inverter outlets are now being supplied power.
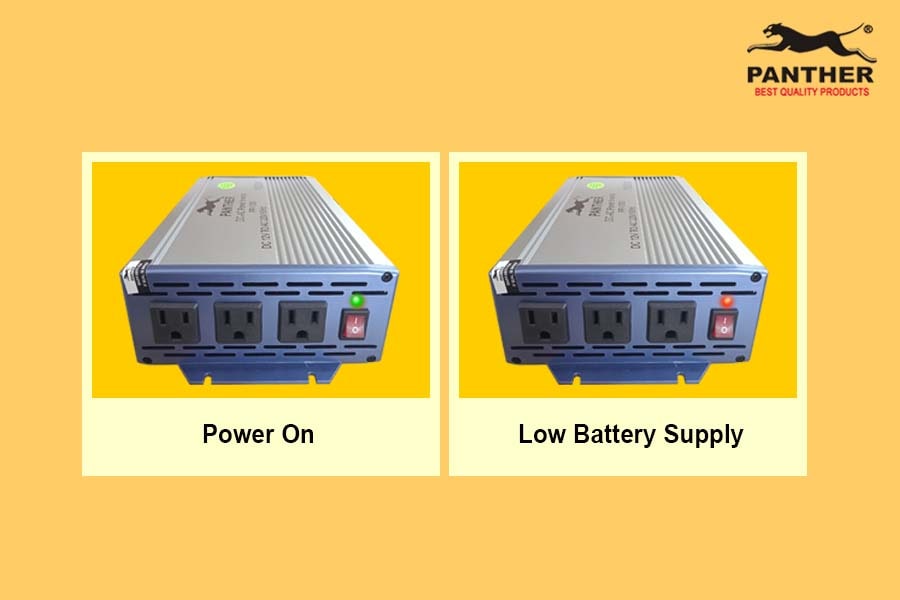
In case of low battery supply, meaning the battery charger is lower than it should be:
- PPI 150 / PPI 300: A continuous beeping sound will be produced
- PPI 500 / PPI 524 / PPI 1000 / PPI 2000 / PPI 1024: A continuous beeping sound will be produced and the RED LED indicator will light up.
If this happens, turn off your power inverter and replace the battery with a good condition battery in order to use the power inverter again. You can also recharge your battery first, before reconnecting the inverter again.
Step 6: Turn on your appliance and it’s now ready to use!
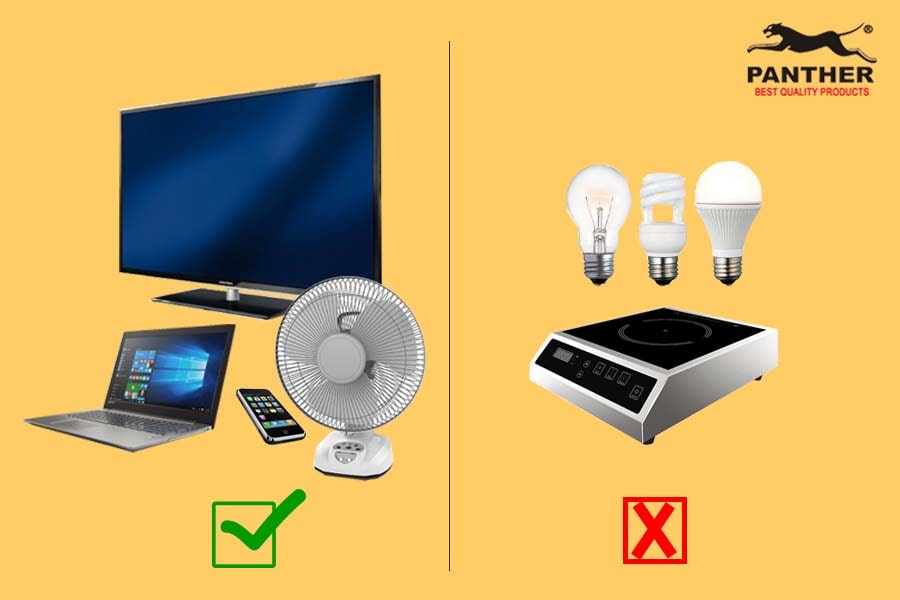
Reminder: This product can be used for charging cellphones, tablet and laptop, TV, stereo/amplifier, fan; but should not be used with T5 – T9 lamp, induction cooker, compressor type equipment and LED products.
Interested to purchase a Panther Power Inverter?
In case you’re looking to purchase a Power Inverter but are unsure where to start, you can check out our article about choosing the best Power Inverter for your needs here: Buyer’s Guide to Purchasing the Best Power Inverters
We have also listed out our available Power Inverters below to make it easier for you to access:
If you encounter unusual activity that seems different from normal operation, don’t hesitate to reach out to us or check out our Panther Power Inverter troubleshooting guide. You may contact us through the following channels and we will be glad to be of assistance.
- Email: wecare.panther@gmail.com
- Landline: (02) 8897-0426 | (02) 8697-4608
- Fax: (044) 769 1605
- Customer Service Hotline (Call/Text/Viber): (0998) 954-3316
- Sales Hotline (Call/Text/Viber): (0908) 811-5438
0 Comments